Mustard Hasselback Kielbasa Bites

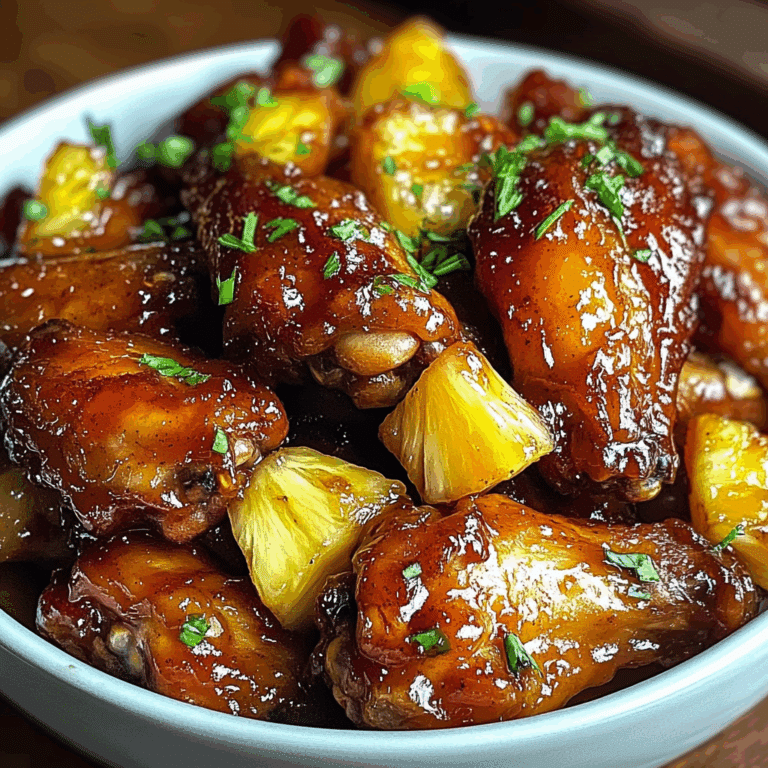
If you’re on the hunt for a savory snack that’s bursting with flavor yet incredibly easy to prepare, these Mustard Hasselback Kielbasa Bites are about to become your new favorite go-to. Imagine slices of kielbasa, thinly sliced in the classic hasselback style, slathered with a tangy mustard glaze, and baked until perfectly crispy on the edges. These bites balance that smoky sausage goodness with a zesty kick, making them irresistibly addictive. Whether you’re serving them for a party appetizer, game day snack, or a cozy evening treat, Mustard Hasselback Kielbasa Bites deliver satisfying flavor in every single bite.
Why You’ll Love This Recipe
- Quick and Easy: Ready in under 30 minutes with simple prep steps that anyone can follow.
- Flavor Explosion: The combination of smoky kielbasa and tangy mustard creates a mouthwatering taste sensation.
- Perfect Party Snack: Bite-sized and easy to share, ideal for gatherings and casual get-togethers.
- Versatile Dish: This recipe works wonderfully as an appetizer, snack, or even a main course side.
- Minimal Ingredients: Relies on familiar pantry staples while delivering maximum flavor intensity.
Ingredients You’ll Need
Gathering a few simple but essential ingredients ensures your Mustard Hasselback Kielbasa Bites are packed with the perfect balance of flavors and textures. Each component plays its part, from the spiced sausage to the tangy mustard that adds a delightful punch.
- Kielbasa Sausage: Choose a good-quality kielbasa with a nice smoky flavor that holds up well to baking.
- Dijon Mustard: Provides tanginess and depth that complements the rich sausage beautifully.
- Honey: Adds a subtle sweetness to balance mustard’s acidity and caramelizes when baked.
- Garlic Powder: Offers a warm, savory layer to enhance the flavor profile.
- Poppy Seeds or Sesame Seeds (Optional): Sprinkle on top for crunch and extra visual appeal.
- Olive Oil or Melted Butter: Helps crisp the edges and keep the sausage juicy.
Variations for Mustard Hasselback Kielbasa Bites
This recipe is wonderfully flexible, making it easy to customize for your taste preferences or dietary needs. Feel free to experiment with flavors and add your own twists.
- Spicy Kick: Add red pepper flakes or hot mustard to the glaze for some heat.
- Sweet and Savory: Swap honey with maple syrup or brown sugar for a different sweetness note.
- Herb Infusion: Sprinkle fresh thyme or rosemary before baking for a fragrant touch.
- Cheesy Version: Add shredded cheddar or Parmesan between the slices for a melty surprise.
- Gluten-Free: This recipe is naturally gluten-free, just double-check your sausage ingredients.

How to Make Mustard Hasselback Kielbasa Bites
Step 1: Preheat the Oven and Prepare the Sausage
Start by preheating your oven to 400°F (200°C). While the oven heats, slice the kielbasa into 3/4-inch thick rounds. Then, carefully make several thin slices across each piece about three-quarters of the way through—this classic hasselback technique helps the flavors seep in deeply and creates crispy edges.
Step 2: Make the Mustard Glaze
In a small bowl, combine Dijon mustard with honey, garlic powder, and a splash of olive oil or melted butter. This glaze will coat the slices, adding both moisture and that irresistible sweet-tangy flavor.
Step 3: Brush the Sausage Slices
Arrange the hasselback kielbasa slices on a baking sheet lined with parchment paper or foil for easy cleanup. Generously brush the mustard glaze over each piece, ensuring it seeps into the cuts to maximize flavor absorption.
Step 4: Add Optional Seeds and Bake
If using, sprinkle poppy or sesame seeds on top for an extra layer of crunch and texture. Bake in the preheated oven for 15-20 minutes until the sausage edges are crisp and golden, and the glaze is caramelized.
Step 5: Serve Warm and Enjoy
Once out of the oven, let your Mustard Hasselback Kielbasa Bites cool just a couple of minutes before serving. These flavorful morsels are best enjoyed warm and fresh from the oven!
Pro Tips for Making Mustard Hasselback Kielbasa Bites
- Slice Carefully: Use a sharp knife for precise hasselback cuts to ensure even cooking and enhanced flavor absorption.
- Don’t Over-Slice: Make sure not to cut all the way through the sausage to keep the slices intact during baking.
- Glaze Multiple Times: Brush the mustard mixture on halfway through baking to keep the bites extra juicy and flavorful.
- Use Quality Kielbasa: A better sausage equals better flavor and texture in your finished dish.
- Watch Baking Time: Keep an eye on the bites near the end to avoid them drying out or burning.
How to Serve Mustard Hasselback Kielbasa Bites
Garnishes
Fresh chopped parsley or chives bring a pop of color and bright, fresh notes to cut the richness of the sausage. Adding a few lemon wedges on the side can also balance the flavors with a zesty finish.
Side Dishes
Pair these bites with classic sides like creamy coleslaw, roasted potatoes, or a crisp green salad to create a well-rounded meal or appetizer platter that will impress your guests.
Creative Ways to Present
Serve the Mustard Hasselback Kielbasa Bites on a wooden platter with toothpicks for easy snacking. Alternatively, arrange them on a bed of sauerkraut or grilled peppers for an eye-catching and flavorful presentation.
Make Ahead and Storage
Storing Leftovers
Place any leftover bites in an airtight container and refrigerate for up to 3 days. They will keep their flavor but may lose some crispiness.
Freezing
Freeze cooked bites by arranging them in a single layer on a baking sheet and freezing until solid, then transfer to freezer bags. They will last up to 2 months and are great for quick snacks later.
Reheating
Reheat leftovers in a preheated oven at 350°F (175°C) for 8-10 minutes to regain crispiness or use a skillet over medium heat for a faster option that keeps them tasty.
FAQs
Can I use other types of sausage for this recipe?
Absolutely! While kielbasa is traditional, smoked sausage, bratwurst, or even chicken sausage work well with this method and flavor combination.
Is this recipe gluten-free?
Yes, Mustard Hasselback Kielbasa Bites are naturally gluten-free, but be sure to check the ingredients on your sausage and mustard to confirm.
Can I make these bites ahead of time?
You can assemble the kielbasa slices and prepare the glaze ahead of time, but for the best texture, bake just before serving.
What is the best mustard to use?
Dijon mustard gives the perfect mix of mild heat and tang, but feel free to experiment with spicy or honey mustard based on your taste.
Can I make a vegan or vegetarian version?
While this recipe is sausage-based, using plant-based kielbasa alternatives and the same mustard glaze can create a tasty vegetarian-friendly snack.
Final Thoughts
There’s something so satisfying about the combination of crispy, smoky kielbasa and that zingy, sweet mustard glaze packed into easy-to-eat bites. The Mustard Hasselback Kielbasa Bites recipe is perfect for every occasion, from casual snacking to impressing friends at your next party. Give it a try—you’ll wonder why you didn’t make these sooner!
Related Posts
PrintMustard Hasselback Kielbasa Bites

Mustard Hasselback Kielbasa Bites are a quick and easy savory snack featuring smoky kielbasa sliced in the classic hasselback style, coated with a tangy mustard and honey glaze, then baked to crispy perfection. Perfect for parties, game day, or casual snacking, these bite-sized morsels deliver a flavorful balance of smoky, sweet, and tangy notes in every crunchy bite.
- Prep Time: 10 minutes
- Cook Time: 20 minutes
- Total Time: 30 minutes
- Yield: 4 servings 1x
- Category: Appetizers
- Method: Baking
- Cuisine: American
- Diet: Gluten Free
Ingredients
Main Ingredients
- 1 lb kielbasa sausage, sliced into 3/4-inch rounds
- 2 tablespoons Dijon mustard
- 1 tablespoon honey
- 1/2 teaspoon garlic powder
- 1 tablespoon olive oil or melted butter
Optional Toppings
- 1 teaspoon poppy seeds or sesame seeds
Instructions
- Preheat the Oven and Prepare the Sausage: Preheat your oven to 400°F (200°C). Slice the kielbasa into 3/4-inch thick rounds. Carefully make several thin slices across each piece about three-quarters of the way through, using the hasselback technique to allow flavors to seep in and to create crispy edges.
- Make the Mustard Glaze: In a small bowl, combine Dijon mustard, honey, garlic powder, and a splash of olive oil or melted butter. This glaze will add moisture and a sweet-tangy flavor to the sausage slices.
- Brush the Sausage Slices: Arrange the hasselback kielbasa slices on a baking sheet lined with parchment paper or foil. Generously brush the mustard glaze over each piece, making sure it seeps into the cuts for maximum flavor absorption.
- Add Optional Seeds and Bake: Sprinkle poppy seeds or sesame seeds on top if desired. Bake in the preheated oven for 15-20 minutes until the sausage edges are crisp and golden and the glaze is caramelized.
- Serve Warm and Enjoy: Let the bites cool for a couple of minutes after baking. Serve warm for the best flavor and texture.
Notes
- Use a sharp knife to make precise hasselback cuts to ensure even cooking and flavor absorption.
- Do not cut all the way through the sausage to keep slices intact during baking.
- For extra juiciness and flavor, brush the glaze on again halfway through baking.
- Select high-quality kielbasa for the best flavor and texture.
- Keep an eye on baking time to avoid drying out or burning the bites.
Nutrition
- Serving Size: 1/4 of recipe
- Calories: 180
- Sugar: 4g
- Sodium: 680mg
- Fat: 12g
- Saturated Fat: 4g
- Unsaturated Fat: 7g
- Trans Fat: 0g
- Carbohydrates: 6g
- Fiber: 0.5g
- Protein: 10g
- Cholesterol: 30mg
Keywords: mustard hasselback kielbasa, kielbasa bites, party appetizers, game day snack, easy baking snack, mustard glaze sausage